| CAUTION! |
|
Routers,
like many other power
tools, are dangerous if
mishandled. Please read
all of the safety
instructions that came
with your router.
Think
of the care you take when
handling a sharp knife,
then multiply that many
times - a router is a very
sharp knife, with the
blade spinning very fast!
Wear
ear protection, even if
routing for a short time -
the high-pitched resonance
of a router will leave a
ringing in your ears for
hours afterwards if you
don't.
If
you're not sure if you
should be trying a
particular operation - DON'T DO IT!.
Routing takes confidence,
which comes from practice
and working up your skills
gradually. Try again when
you're more experienced.
Routers are very
versatile tools, but they
have a serious bite if you
get it wrong!
|
General
Care and Safety
Always
take extreme caution when removing
the protective wax from a new
cutter. Do not pull it off, as the
sharp cutting edges could cause
injury. Carefully slit the wax
with a sharp knife along the
internal angle of the flute and
prise the coating away. Before
using a new cutter, wipe off any
protective oil to prevent it
transferring and marking the
surface of the work.
Never
pull the cutter from the router by
the cutting edges without
protecting your hands. If your
fingers slide along the cutting
edges, you will find out just how
sharp they are, then you'll delay
progress whilst you receive first
aid - and you could also
bloodstain your wood!
Design
Whatever
the size of the router bit shank,
it is held into the tool with a
collet assembly. This is simply a
device which relies on tightening
a nut against a taper to grip the
cutter shank equally around its
circumference. The router shaft
(or arbor) is hollowed and
threaded at the "business" end.
The collet fits into this hollow,
acting against an internal flange,
or taper, once the nut is
tightened. Some routers require
that the arbor is held by a
spanner whilst the nut is
tightened:

Old-style
shaft |

Two
spanners required |
Others have a
press-button spindle lock fitted,
which holds the arbor, thus
requiring only one spanner to be
used:

Modern
Spindle-lock |

One
spanner required |
| Older-style
collets had a separate
steel ring inserted in the
collet nut. More advanced
collet assemblies have a
ring machined within the
nut that engages the
collet, automatically
releasing it from the end
of the spindle as the nut
is undone. These are
typically made of high
quality, polished tempered
steel and have multiple
slits, ensuring both
security and concentricity
for the cutter. They also
feature slits starting
from alternate edges of
the collet to provide even
pressure over the full
surface area of the cutter
shank. |
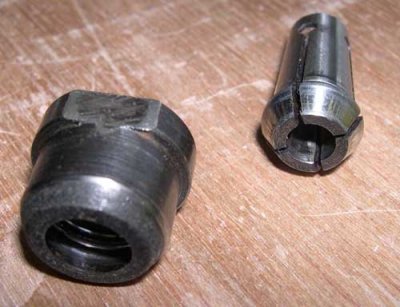
Old-style
Collet |

Side
View
Drawing |
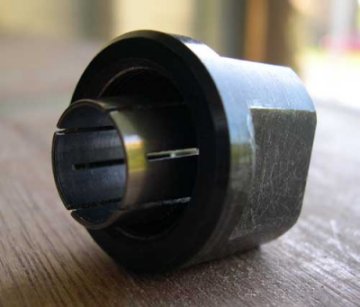
Double-lock
Collet |
A
double-lock system is incorporated
by some manufacturers. When the
nut is undone, it will first
loosen and then appear to
re-tighten, requiring loosening a
second time. This design prevents
the cutter shank being released if
the collet nut accidentally
loosens while the router is
running. The latest design collet
systems have their collet and
collet nut factory assembled and
should not be separated.
Collet
Safety
|
Always
insert as much of the
shank as possible into
the collet and at least
three quarters of the
shank length as a
minimum, to decrease the
chances of deflection of
cutter when under load.
This in turn will
prevent damage to the
collet, reduce wear and
stress on the router
bearings and avoid the
possibility of shank
damage. However, don't
allow the end of the
cutter to be in
contact with
the internal end of the
armature recess.
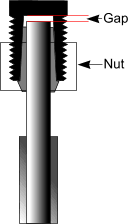
Always
maintain a gap (see
diagram) of 1/16"
(1.5mm). This will
prevent the possibility
of any "hammer action"
being induced which
could cause the cutter
to creep out of the
collet (the collet nut
is represented by a
rectangle, for clarity).
|
 |
| Never
clamp a short portion of
the shank in the collet to
gain extra length! |
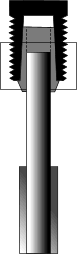 |
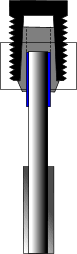
| Never
use collet reducers (shown
in blue here) as a means
of extending the length of
the shank! |
 |
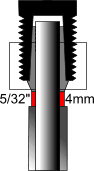
| Always
ensure that you have a minimum
gap of 5/32"
(4mm) between the
collet and the cutter
(shown here in red). |
 |
Cleanliness
Pays
Make
sure that the collet is kept
perfectly clean and
corrosion-free. Resin can work its
way up the slits of the collet and
build up around the cutter shank
and the inside collet faces. Resin
build-up may cause uneven contact
between the internal collet face
and cutter shank. This could
create a resonance, causing the
shank to slip and leading to
collet burn, deposits being
evident on the shank as brown
marks. Resin build-up can be
removed by using an appropriate
solvent and a fine wire brush.
Surface
corrosion can also occur on the
inside face of the collet, which
will restrict insertion and
removal of the cutter. It can also
cause scoring of the mating faces
and could significantly damage the
collet - sometimes beyond repair.
Dust,
corrosion or dirt will decrease
the ability of the collet to grip
or release the cutter shank. Other
problems include the shank
slipping, bit or collet seizing,
or excess vibration leading to
shank bending or breakage. A fine
wire brush will remove such
deposits, but don't use
glass-paper as this will leave
scratches, which could cause
further problems.
If
either the collet or its nut are
faulty, it is best to change both
as soon as possible. Don't use
cutters with damaged shanks, as
this will lead to trouble. To
prevent cross-threading and damage
to the threads of the collet nut,
the inside of the nut should be
kept clean and free of burrs. If
in doubt, replace the nut at the
same time as the collet.
Keep
both the inside and outside
tapered surfaces of the collet
clean and free from dust, resin
and dirt. This also applies to the
inside taper of the arbor and the
threads of the nut and arbor.
Remove any deposits with a wire
brush and regularly protect the
surfaces with light oil or
anti-corrosion spray.
Keep It
Cool
A
problem can arise from metal
fatigue in the collet, due to heat
being transferred from the cutter,
as repeated heating and cooling
cycles may alter the original
steel tempering. Sprung steel
requires a degree of inherent
elasticity in order to properly
grip the cutter shank. This is
reduced over time and increased
tightening of the collet is then
needed. This will eventually
distort the collet, preventing it
from exerting an even grip.
Therefore, collets that need
excessive tightening should be
swiftly replaced.
Bad
Vibrations
If
vibration is noticeable when you
are routing, switch
off at once and investigate.
First, check that the cutter shank
is not bent, that the cutter is
not damaged or blunt and that the
cutting edges are not chipped.
Vibration can result from a worn
collet, which is holding the
cutter out of line to the arbor
axis. This may be due to a
condition called "bell-mouthing"
within the collet. Collet marks on
the shank will show that the
collet is worn and this can be
checked by inserting a long cutter
and tightening the nut. Apply
sideways pressure on the end of
the cutter and if there is any
sign of movement, the collet must
be replaced.
Replace
the collet and the nut at the same
time. If there is no apparent wear
in the collet or nut, the problem
may be wear on the arbor, or
within the router's main bearings,
both major service tasks.
Finished
For The Day?
Always
remove the cutter from the
router after use. This will
avoid continual pressure being
applied to the collet and the
cutter shank, which could, in
time, cause a permanent
distortion. After cleaning,
lightly oil the collet before
storing, particularly in humid
conditions, to avoid corrosion or
surface pitting.
Correct
Feeding Essential
The feed direction is the
direction in which the cutter is
fed into the material or, in the
case of table mounted or fixed
routers, the material into the
cutter.
Following
the correct feed direction will
ensure safer and easier working,
and allow the cutter to cut
efficiently. The correct feed
direction is always against
the rotation of the cutter.
This can be ascertained by looking
at the cutter itself. Routers
rotate in a clockwise direction
(when looking down from above the
machine) and this determines the
direction in which the cutter
rotates and - subsequently - the
feed direction.

If
the feed direction is incorrect,
the forces involved in cutting
will cause the cutter to try to
drag the router along the
workpiece. This situation can
swiftly become unstable and
dangerous, particularly if it
takes the operator by surprise.
When
routing inverted in a table, the
feed direction is right to
left. If the material is
inadvertently fed in the wrong
direction, it could be ripped away
from the operator and - in the
worst case - drag the operator's
hand into the cutter. Whilst it is
possible to take a very light
"cleaning" pass in the "wrong"
direction (known as "climb
cutting"), this is an
operation that should only
be attempted when the operator is
fully conversant and totally
confident in handling
and controlling their machine.

It
is a good practice to mark the
direction of feed (right to left)
on the worktable fence when using
your router inverted in a table.
With portable routers, the
rotational direction of the cutter
is often marked on the machine,
although with experience this will
become second nature.
Speed Is
Important
|
Many
modern routers have
variable speed, set with
a thumb-wheel or slider.
Some have a recommended
speed chart attached to
the router body, like
this one which relates
to the markings "A" to
"F" on the speed
thumb-wheel and speeds
of between 10,000 and
23,000 rpm.
Routers
with a single speed will
rarely be able to use
large cutters, as they
will exceed the RPM
recommended by the
cutter manufacturer.
Separate variable speed
controllers are
available for connecting
between the router and
the power source.
However, these are
unlikely to offer full
wave rectification or
speed compensation and
do not maintain the
available power evenly
throughout the speed
range. Inferior types of
speed controller can
also affect the smooth
running of a router,
particularly at lower
speeds.
|
 |
To
minimise wear on the router motor
bearings, to prevent cutter damage
and to improve the finish of the
cut face, it is important to
maintain a constant feed speed.
Variations in the type of
material, type and condition of
the cutter and the available
router power will all have an
effect on feed speed. It is for
the woodworker to judge, by the
sound of the router motor, whether
the motor is labouring. In time,
you will acquire a feel for the
router and a feed speed relative
to the work in hand will come
naturally. You will find that a
narrow cutter can be used at a
higher speed than a wider one,
although very narrow cutters will
need a slower feed speed and
smaller depth of cut to prevent
breakage.
Feed speed will also be affected
by the type and density of the
wood, the grain direction and any
variation in the texture of the
material along the cutting line.
Beware of hard knots as these can
damage the cutting edges or even
chip or fracture the TCT tips.
Also avoid 'dead' or loose knots,
as they can be ejected and cause
injury, as well as causing tip
fracture.
If the cutter is inclined to burn
the material, it is a sign that
the cutter is blunt, or that it is
being fed along the cut too
slowly.
Working
With Templates
Templates are very useful for the
production of identical parts all
at one time, or the exact
replication of a part at any later
date. They can be used in a couple
of different ways, either with a
bit that is equipped with a guide
bearing, or by using a guide bush
in the router base.
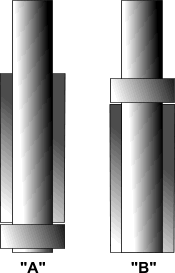
| If the bearing-guided
cutter is to be used, the
template must be made to
the exact size of the
finished article. Whether
the bit has the follow
bearing at the bottom (as
in "A") or the top of the
cutter (as in "B") -
some specialist cutters
have both - dictates how
the template is used with
the stock material. |
 |
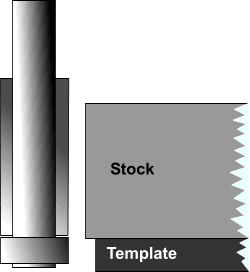 |
When
using a bit with a
bottom-mounted guide
bearing, the template
must be BELOW the stock
to be routed. The bit
depth is adjusted to
ensure that the bearing
will contact the
template, then engaged
with a sideways motion.
Once the bearing is in
contact with the
template, it will follow
the template shape,
removing excess stock
until the shape matches
that of the template.
To
save stress on the
cutter, first remove as
much excess material as
possible from the stock
(jigsaw, bandsaw, etc.),
then there will be less
material for the router
bit to deal with.
|
|
When
using a bit with a
top-mounted guide
bearing, the template
must be ABOVE the stock
to be routed. The bit is
adjusted to again ensure
that the bearing will
contact the template,
then engaged with a
sideways motion. Once
the bearing is in
contact with the
template, it will also
follow the template
shape and remove excess
stock until it matches
the shape of the
template.
As before, first remove
as much excess material
as possible from the
stock.
|
 |
Working
With Guide Bushes
 |
Using
a guide bush in the router
base is another common way
of following a template,
with two major
differences. The first is
that there is no need to
use a bearing-guided
cutter - a straight cutter
is suitable for the task. |
| Secondly,
the size of the template
will differ from the
intended finished article.
With internal templates,
such as a circle-cutting
design where the guide
bush follows an internal
edge, the actual template
will need a hole larger
than the finished
dimensions by the distance
between the outer surface
of the guide bush collar
and the cutting edge of
the bit (the collar-to-bit
offset), as shown here. |
 |
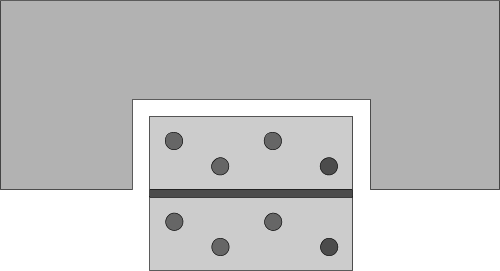 |
Therefore,
when cutting a template
for hinge fitting, because
you are cutting the
mortice using internal
edges, the template has to
be larger than the hinge
by the collar-to-bit
offset. |
| For
external templates, where
the guide bush collar
follows an external edge,
for example, when making a
curved shape, the template
will need to be smaller
than the finished
dimension by the
collar-to-bit offset. |
 |
When
a router follows a template, it
will reproduce everything it
follows, including lumps, dips and
roughness. So one thing is clear -
the more time you spend in getting
the template edge absolutely
smooth and free of imperfections,
the better the finished result
will be. My preference for
templates is MDF, because I find
it easier to get a smoothly-sanded
finish on the edges than I do with
plywood.
The router is a very versatile
tool and one that is very
satisfying to handle skillfully.
As with any other skill or
technique, practice is the main
ingredient to success.
Above all,
please BE
SAFE!
Safety
"A to Z"
| A |
ALWAYS use
the router and other power
tools in a safe manner and
away from children. |
N |
NEVER leave
the router running
unattended. Wait until the
router comes to a complete
stop and switch off at the
wall outlet before making
adjustments, changing the
cutter or operating the
spindle lock. |
| B |
BEWARE of
unsafe working practices
and potential hazards when
using a router. |
O |
OBSTRUCTIONS
should be kept clear of
the path of the router and
the routing area. Do not
clear swarf or other
debris away from the
cutting area with the
machine still running. |
| C |
CLOTHING,
such as ties or loose or
baggy garments, which may
be accidentally caught and
pulled into the cutter
should not be worn, or
should be tied back when
using a router. |
P |
POWER to
the router must always be
switched off and the
machine isolated from the
supply before changing
cutters or making
adjustments. Make sure the
power switch is 'Off'
before plugging in, to
avoid accidental starting. |
| D |
DUST
presents a severe health
risk if inhaled. Always
wear a dust protector
and/or use a vacuum
extractor connected
directly to the router. |
Q |
QUESTIONS
regarding the safe
operation of your router
should be directed to the
manufacturer's technical
department. |
| E |
EYE
protection must also be
worn to protect the
operator from ejected
waste particles.
EAR protection should also
be worn, especially when
routing for long periods
of time. |
R |
ROUTERS
must be allowed to reach
their full running speed
before commencing any
routing operation. Do not
switch the router on with
the cutter touching the
workpiece. |
| F |
FEED
direction of the cutter
into the workpiece, or the
workpiece into the cutter,
should be against the
rotation of the cutter. |
S |
SHORT-CUTS
must not be taken to the
detriment of safe working
practices. |
| G |
GUARDS
should always be used when
using a router mounted in
a table. Always ensure
that your fingers cannot
make contact with the
cutter. Always use a push
stick together with hold
down clamps or
featherboards when
machining small timber
sections when the router
is mounted in a table. |
T |
TIDY work
areas and benches help to
prevent accidents. Always
keep the floor around the
work area clear of all
obstacles. Store router on
a shelf, in a cupboard or
in a storage box, so
debris cannot fall into
the air intake. |
| H |
HURRIED
setting up can lead to
accidents. Take your time
to prepare yourself and
the machine. Carry out
safety checks before
switching on. |
U |
UNDERSTANDING
the current statutory
woodworking regulations is
essential for all
professional users. |
| I |
INSPECT the
condition of the router
cutter before use. Ensure
that the cutter is held
firmly in the collet,
rotates freely and is well
away from the work before
the power is switched on. |
V |
NO-VOLT
release switches should be
fitted to all
table-mounted routers,
both to isolate the router
in an emergency and to
prevent it switching back
on when power is restored
after a power failure or
supply disconnection. |
| J |
JUDGE the
correct feed speed by
listening carefully to the
tone of the router. |
W |
WORKPIECES
must always be securely
and safely clamped to the
work bench, in a vice or
by some other means prior
to commencing the routing
operation. Make sure that
clamps are not within the
path of the router. |
| K |
KEEP router
cutters sharp. Take care
when handling them,
especially when removing
them from the collet or
from a storage block. |
X |
EXAMINE
the cutters and router
collet before use. Equally
check that any knobs or
screws on the router are
tight and have not
vibrated loose. |
| L |
LISTENING
to the sound of the router
will often indicate that
the cut is being made too
deep or that the cutter is
blunt. |
Y |
YOUR safety
when routing is more
important than the router
or its cutters. |
| M |
MANUALS and
other information supplied
with the router or cutters
should be read thoroughly
to ensure you are familiar
with the controls,
functions and operating
procedures. |
Z |
ZERO
accidents should be the
first consideration when
using routers and other
power tools. |

|
